
Node.js has become a powerhouse for backend development, powering everything from simple APIs to complex enterprise applications. However, once your application is running perfectly on your local machine, the next big challenge is getting it live.
Advertisement
Ad Space (728x90)
Google AdSense — Admin panel se add karein
Node.js has become a powerhouse for backend development, powering everything from simple APIs to complex enterprise applications. However, once your application is running perfectly on your local machine, the next big challenge is getting it live.
Historically, deploying Node.js to cPanel shared hosting was considered a headache. Most developers associated cPanel strictly with PHP. But modern cPanel versions have changed the game. With the built-in "Setup Node.js App" feature (powered by Phusion Passenger), migrating and deploying your Node.js application is now incredibly straightforward.
Whether you are a beginner or a seasoned developer, this complete guide by ActiveX Enabling Technologies will walk you through every step required to successfully migrate your Node.js app to cPanel.
Understanding the cPanel Node.js Environment
Before you start uploading files, it is crucial to understand how cPanel handles Node.js. cPanel uses an application server (usually Passenger) to manage your Node.js processes. This means:
-
You don't manage the server manually. cPanel will start, stop, and restart your app.
-
Ports are handled automatically. You cannot hardcode a specific port (like
3000). -
You must define a startup file. cPanel needs to know exactly which file to run to boot your app.
Step 1: Prepare Your Application for Migration
Before uploading your code, you must make a few crucial adjustments to ensure your app runs smoothly on shared hosting.
1. Remove Hardcoded Ports
cPanel handles routing for you. If your main file (e.g., app.js or server.js) has app.listen(3000), it will likely cause a "503 Service Unavailable" error.
-
Fix: Change it to
app.listen(process.env.PORT || 0). Alternatively, if you are using Express, you can simply export the app and let cPanel handle the listening:module.exports = app;.
2. Check ES Modules vs. CommonJS
Some cPanel Node.js environments still default to CommonJS. If your package.json includes "type": "module" and you are using import statements, you might run into issues. If the app fails to start, try converting your import syntax back to require().
3. Exclude node_modules
Do not upload your node_modules folder. It contains unnecessary files, takes a long time to upload, and might contain binaries compiled for your local OS (like Windows or Mac) that won't work on the Linux-based cPanel server. cPanel will run npm install for you later.
4. Ensure package.json is Present
Your project's root directory must contain a valid package.json file listing all your dependencies.
Step 2: Create the Application in cPanel
-
Log in to your cPanel account.
-
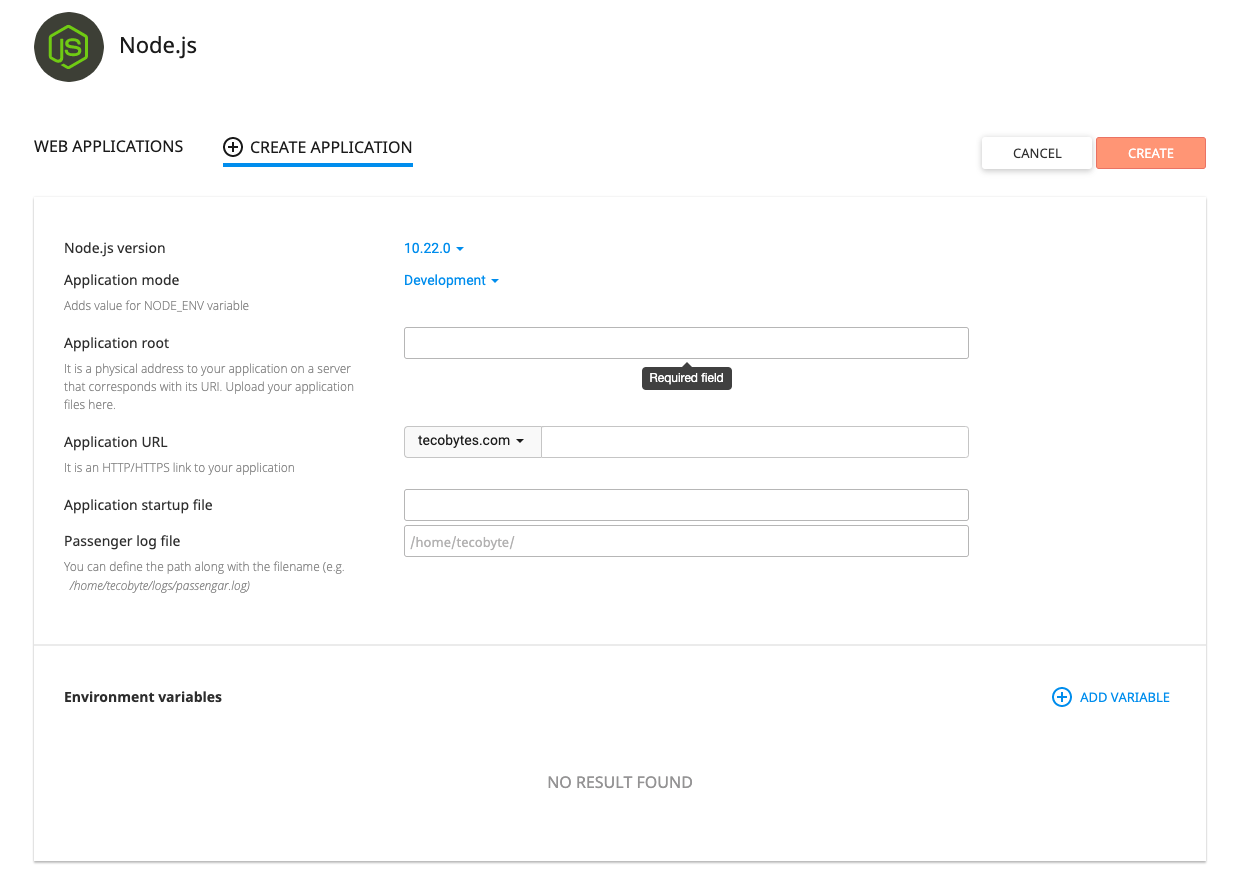
Scroll down to the Software section and click on Setup Node.js App.
-
Click the Create Application button.
-
Fill in the required details:
-
Node.js version: Select the version that matches your local environment (e.g., 18.x, 20.x).
-
Application mode: Select
Production. -
Application root: Enter a folder name for your app (e.g.,
my-node-app). Important: Do not put this insidepublic_html; keep it in your home directory to prevent source code exposure. -
Application URL: Choose the domain or subdomain where your app will run.
-
Application startup file: Enter your main file name (e.g.,
app.js,index.js, orserver.js).
-
-
Click Create.
Step 3: Upload Your Files via File Manager
-
Open the File Manager in cPanel.
-
Navigate to the Application root folder you just created (e.g.,
/home/username/my-node-app). -
Zip your local project files (excluding
node_modulesand.env). -
Upload the
.zipfile and use the Extract feature in File Manager.
[Image Placeholder: Search for "cPanel File Manager Upload and Extract zip" to show the interface]
Step 4: Run NPM Install
Now you need to install the dependencies.
-
Go back to Setup Node.js App in cPanel.
-
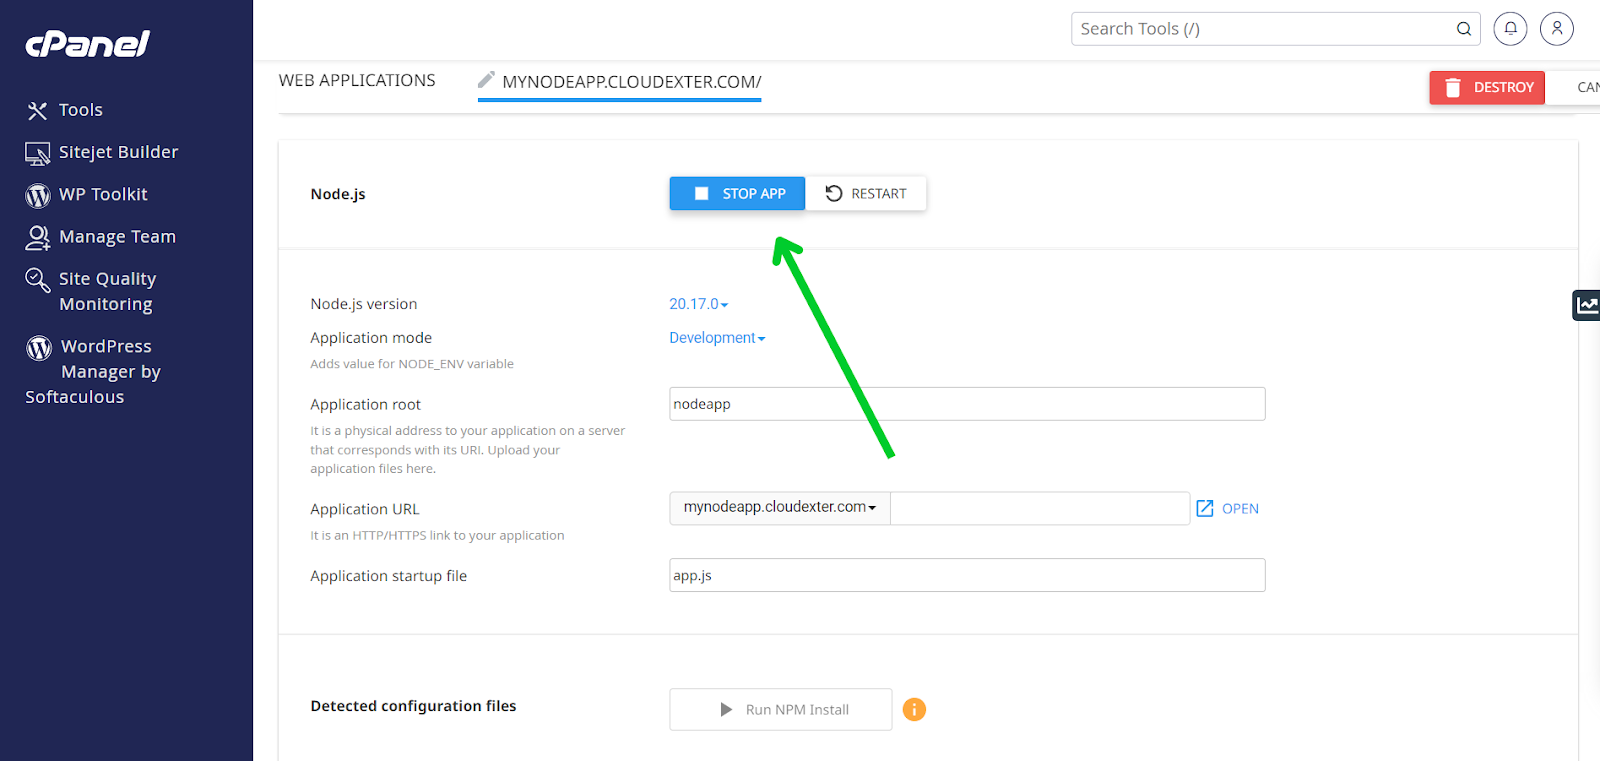
Find your application in the list and click the pencil (Edit) icon.
-
Click the Run NPM Install button. cPanel will read your
package.jsonand download all required packages into thenode_modulesfolder within your application root.
Step 5: Set Up Environment Variables
Never upload your .env file directly. Instead, add your secrets (like Database URIs, API keys, and JWT secrets) securely via cPanel.
-
In the application edit screen, scroll down to the Environment variables section.
-
Click Add Variable.
-
Enter the Name (e.g.,
DB_URI) and the Value. -
Click Save.
Step 6: Restart and Test
-
Click the Restart button at the top of the application settings page to apply changes.
-
Open the Application URL in your browser. If everything was configured correctly, your Node.js app should now be live!
Troubleshooting Common cPanel Node.js Errors
Even with careful preparation, you might encounter a few hiccups. Here is how to fix the most common ones:
-
503 Service Unavailable: This almost always means your app crashed on startup. Check the
stderr.logfile in your application root. The most common causes are hardcoded ports (app.listen(3000)) or a syntax error in your code. -
"Cannot GET /" Error: If your app works locally but throws this error on cPanel, it usually means your app is placed in a subdirectory. Ensure your routes and static asset paths account for the application root.
-
App Not Updating: Whenever you upload new code, you must click the "Restart" button in cPanel. Node.js caches the app in memory; it won't read new files until restarted.
Conclusion
Migrating a Node.js app to cPanel no longer requires a degree in server administration. By following the correct preparation steps—especially handling the port dynamically and utilizing cPanel's "Setup Node.js App" feature—you can deploy your application quickly and securely.
Need professional help with your web development, Node.js deployment, or digital marketing? ActiveX Enabling Technologies is here to help. Our new, fully operational office in Bahria Town, Karachi, is equipped to handle all your digital needs.
Contact ActiveX Today:
-
Office: 501, 5th Floor, Midway B. Commercial, Bahria Town, Karachi.
-
Website: www.activex-pk.com
-
Contact: +92-3-392-192-111
Frequently Asked Questions (FAQs)
Q1: Can I run a Node.js app on any shared hosting?
A: Not all. Your hosting provider must have cPanel with the "Setup Node.js App" feature enabled (usually powered by CloudLinux or Phusion Passenger). Always check with your hosting provider first.
Q2: Why do I get a 503 error after uploading my app?
A: A 503 error means the application failed to start. Check your code to ensure you aren't hardcoding a port (like app.listen(3000)). Use app.listen(0) or process.env.PORT instead. Also, check the stderr.log file in your app folder for specific errors.
Q3: Should I upload my node_modules folder?
A: No. You should never upload the node_modules folder. cPanel will automatically install your dependencies when you click the "Run NPM Install" button in the Node.js App settings.
Q4: How do I update my Node.js application later?
A: To update your app, upload the new files via File Manager (overwriting the old ones), run "NPM Install" again if you added new dependencies, and crucially, click the "Restart" button in the Node.js App dashboard.
Advertisement
Ad Space (728x90)
Google AdSense — Admin panel se add karein